

How Can You Tell If a Fuel Injector Is Bad: 8 Proven Signs and Tests
How can you tell if a fuel injector is bad? You can identify a faulty fuel injector by spotting symptoms like rough engine idle, misfires, or an erratic tachometer needle. These signs reveal that the injector isn’t delivering fuel properly, so start by checking for unusual engine behavior or a check engine light.
Key Takeaways
- A bad fuel injector often causes rough idling, reducing engine smoothness during operation.
- An erratic RPM or tachometer needle usually signals inconsistent fuel delivery from the injectors.
- The check engine light can illuminate due to injector failure among other issues.
- Clogged injectors restrict fuel flow, causing engine hesitation and poor acceleration.
- Leaking injectors may create fuel odor and increased consumption.
- Stuck injectors either remain open or closed, resulting in flooding or no fuel delivery.
1. How to Identify a Bad Fuel Injector by Symptoms

A bad fuel injector can significantly affect your engine’s performance by disrupting the proper fuel delivery to the combustion chamber. When an injector starts to fail, you’ll likely notice symptoms such as a rough idle or engine misfires. These happen because the fuel isn’t being atomized and distributed evenly, resulting in inconsistent combustion. That rough idle and misfiring directly cause unstable RPM levels, which feel like your engine is stumbling as it runs.
Hard starting and hesitation during acceleration are also common symptoms. A faulty injector may deliver either too much or too little fuel, causing the engine to struggle when you hit the gas or when you first crank it. Poor fuel economy often follows because your engine works harder to compensate for improper fuel mixture. It’s important to recognize these signs early to avoid more serious engine damage or costly repairs.
The check engine light often illuminates when the onboard diagnostics detect issues related to fuel delivery. Fuel injector problems can cause misfire codes or circuit faults that trigger this warning. Keep in mind that while the check engine light indicates a problem, it doesn’t always mean the fuel injector is the sole issue. Other related components, like spark plugs or oxygen sensors, could also cause similar symptoms, so proper diagnosis is necessary.
- Rough idle or engine misfires disrupting stable RPM
- Hesitation or weak acceleration when pressing the gas pedal
- Hard starting or frequent stalling during engine warm-up
- Strong fuel odor near the engine or inside the cabin
- Check engine light turning on or flashing under load
- Black smoke from the exhaust indicating rich fuel mixture
- Poor fuel economy despite normal driving habits
A noticeable fuel smell or black exhaust smoke usually points to leaking or stuck-open injectors that flood the engine with fuel. This excess fuel doesn’t burn completely, creating black smoke and odor. It also increases emissions, which can cause your vehicle to fail inspection. Tracking these specific symptoms helps pinpoint whether the injector is delivering too much fuel or not working at all.
Watching how your engine responds during startup, idling, and acceleration can tell you a lot about injector health. Pay attention to the fuel smell, exhaust color, and any warning lights on your dashboard. Catching these signs early lets you address injector problems before they cause bigger issues like catalytic converter damage or severe engine knocking.
2. Differences Between Clogged, Leaking, and Stuck Fuel Injectors
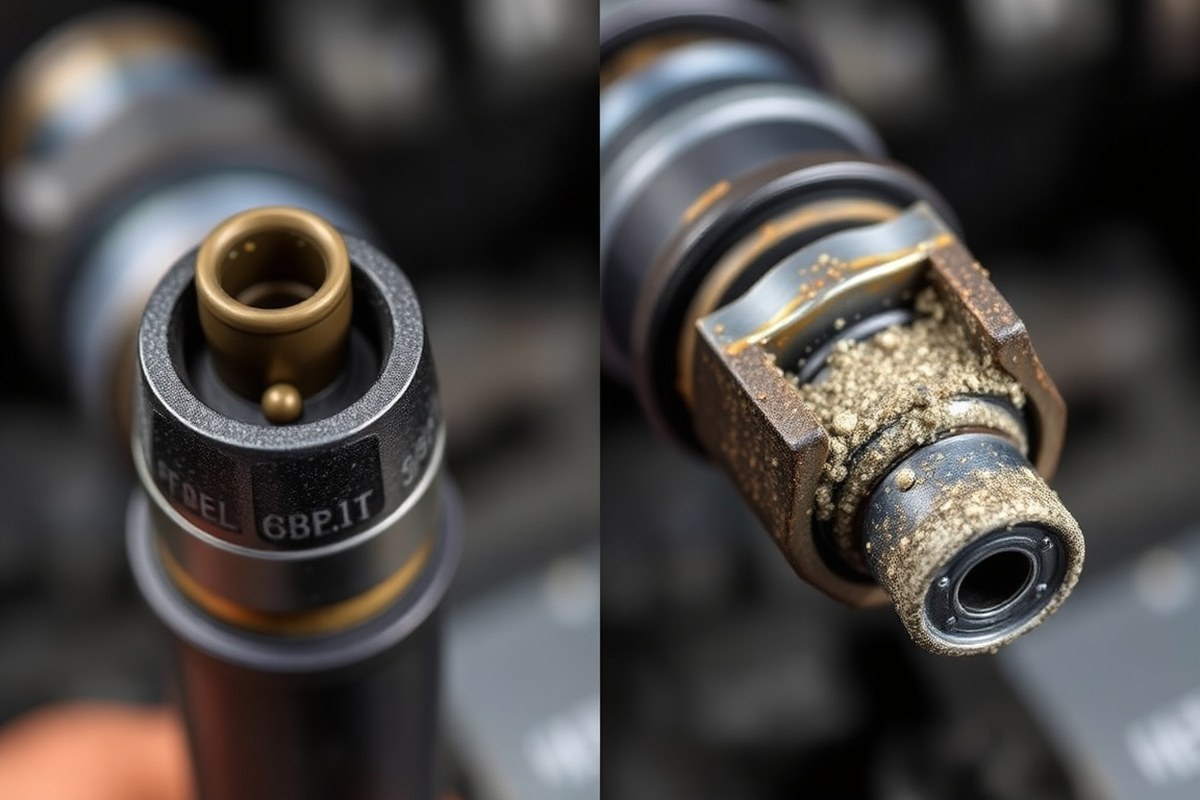
A fuel injector can fail in several ways, clogged, leaking, stuck open, or electrical failure, and each cause leads to different symptoms. Recognizing these differences helps you decide on the best fix, whether cleaning, repair, or replacement.
Clogged injectors restrict fuel flow or deliver a poor spray pattern. This causes the affected cylinder to run lean, meaning it gets too little fuel. Expect to notice hesitation, weak acceleration, or misfires. These symptoms result from an uneven air-fuel mixture that’s too heavy on air. Cleaning clogged injectors with a quality fuel injector cleaner can sometimes restore proper flow, especially if deposits cause the blockage.
Leaking or stuck-open injectors flood the cylinder by delivering too much fuel, creating a rich-running condition. Common signs include hard starting, black smoke from the exhaust, and a noticeable fuel smell. Since mechanical damage often causes leaks, cleaning typically won’t fix the problem. In these cases, sealing issues or physical damage require repair or replacement.
Electrical failures make the injector unresponsive. The cylinder affected may appear dead, showing no combustion due to the lack of fuel. Diagnosing such problems usually involves reading injector circuit trouble codes. Cleaning won’t help when electrical faults cause injector issues.
| Failure Pattern | What Happens | Typical Evidence | Can Cleaning Help? |
|---|---|---|---|
| Restricted or dirty | A cylinder experiencing insufficient fuel or an uneven spray pattern can cause performance issues. | Lean misfire, hesitation, weak acceleration | Sometimes |
| Leaking or stuck open | Cylinder receives too much fuel | Hard starting, black smoke, rich condition | Usually not if mechanically damaged |
| Electrical failure | Injector does not respond correctly | Dead cylinder or injector-circuit code | No |
Injectors can become clogged due to fuel impurities or buildup over time, especially if using lower-tier fuels that leave more deposits. Leaks tend to occur from worn seals, corrosion, or physical damage. A corroded connector or wiring issue may mimic some injector symptoms, complicating diagnosis. Cleaning the injectors typically helps only if deposits block the nozzle or restrict spray patterns. It does not fix leaks caused by damaged components.
Pay attention to symptoms that suggest fuel is either insufficient or excessive. A lean misfire implies clogged or restricted injectors, while strong fuel odors, black smoke, or flooding point toward leaking or stuck injectors. Diagnostic tests can confirm the exact failure type and guide repair.
Tip: Avoid relying solely on fuel injector cleaner if symptoms persist after treatment; a thorough inspection or professional diagnosis may be necessary to prevent engine damage.
3. Step-by-Step Methods to Test Fuel Injectors at Home
Testing fuel injectors at home involves listening for their activation, measuring electrical resistance, running a fuel injector balance test, and scanning for trouble codes. These steps help determine if injectors deliver fuel properly, respond electrically, and affect fuel pressure as expected.
Listening for Injector Activation
You can safely check if fuel injectors activate by listening while the engine runs. This test reveals whether injectors are opening and closing as they should, producing a clicking sound.
Use a mechanic’s stethoscope or a lengthy screwdriver to listen to injector noises from a safe distance of heated engine components. Place the tool’s end on the injector casing and listen for consistent clicking. No sound or irregular clicking signals a possible injector issue.
- Warm up the engine to normal operating temperature and keep it idling.
- Turn off accessories like the radio and fan to reduce background noise.
- Wear safety gloves to protect your hands from hot parts.
- Use a mechanic’s stethoscope or a long screwdriver and place it firmly on the metal body of the first injector.
- Listen carefully for a regular clicking sound about 1-2 clicks per second indicating proper operation.
- Repeat on each injector, comparing sounds for uniformity.
- Note any injector making no sound or different from the others.
The main cost for this method is having a basic mechanic’s stethoscope, which can range from $10 to $30. A quiet environment improves detection, helping catch subtle injector problems early.
Checking Injector Electrical Resistance
Measuring the electrical resistance of fuel injectors with a multimeter tests their internal coil health. Good resistance ensures the injector can receive electrical signals to operate properly.
Typically, gasoline engine injectors have resistance readings between 12 and 16 ohms. Values outside this range, too high, too low, or infinite, indicate potential internal damage or wiring issues.
- Turn off the engine and disconnect the battery to avoid electrical shorts.
- Locate the fuel injectors and disconnect their electrical connectors.
- Set a digital multimeter to the ohms (Ω) setting.
- Touch the multimeter probes to the injector’s two electrical terminals.
- Record the resistance value and compare it to the manufacturer’s specification (commonly 12-16 Ω).
- Repeat for each injector and look for readings that deviate significantly.
- Reattach connectors and reconnect the battery after testing.
A digital multimeter usually costs between $15 and $50 for a basic model. Consistent resistance across injectors signals good electrical condition, while variance often points to faults needing further diagnosis or replacement.
Performing a Fuel Injector Balance Test
The fuel injector balance test compares how each injector affects fuel pressure when energized individually. This test shows whether all injectors supply similar fuel volume, detecting weak or clogged units.
Fuel pressure drops during injector activation because each injector sprays fuel, temporarily lowering the system’s pressure. Smaller or inconsistent pressure drops suggest underperforming injectors. To perform this test, you need a fuel pressure gauge connected to the fuel rail and a driver or helper to pulse the injectors one at a time.
- Relieve fuel system pressure by following vehicle-specific procedures.
- Attach a fuel pressure gauge to the fuel rail test port.
- Turn the ignition to ON without starting the engine to build rail pressure.
- Have an assistant activate each injector individually using a scan tool or jumper wire.
- Observe and record the pressure drop during each injector’s activation.
- Compare drops; consistent values indicate healthy injectors, while a smaller drop points to a failing injector.
- Release pressure safely and remove the gauge after testing.
Fuel pressure testers cost about $30 to $100. Some vehicles require scan tools to pulse injectors electronically, adding to the investment. This test is more advanced and reveals fuel delivery problems not found by resistance checks or listening tests.
Using an OBD-II Scanner for Injector Codes
Scanning your vehicle with an OBD-II scanner provides diagnostic trouble codes relating to fuel injectors. These codes help pinpoint electrical or firing issues with specific injectors or circuits.
Common injector-related codes include misfire codes (like P0302 for cylinder 2) and injector circuit faults (such as P0202). Accessing these codes requires a basic OBD-II scanner, often available for $20 to $50.
- Connect the OBD-II scanner to the vehicle’s diagnostic port, usually under the dashboard.
- Turn the vehicle ignition to ON or start the engine, depending on scanner instructions.
- Access the scanner menu and select “Read Codes” or a similar option.
- Write down any injector-related codes displayed.
- Consult the scanner manual or online resources to interpret the codes.
- Clear codes after inspection if needed to see if they return.
These codes guide further testing by narrowing down which injector or electrical circuit is at fault. Using an OBD-II scanner improves diagnosis speed and accuracy before physically testing injectors.
4. Common Causes That Lead to Fuel Injector Failure
Fuel injector failure usually results from a combination of environmental conditions, fuel quality, and mechanical or electrical issues. Contaminants in fuel, exposure to high heat, and wear over time degrade injector performance. Electrical faults can also damage injectors, leading to uneven fuel delivery or engine problems.
Fuel Contaminants and Clogging
Contaminants in fuel can clog injector nozzles and reduce spray quality, causing misfires and poor engine performance. Dirt, rust, water, and other debris often enter the fuel system from poor fuel storage or degraded fuel filters. These particles build up in the small injector openings, restricting fuel flow.
Using fuel with impurities or skipping regular fuel filter changes allows buildup to occur faster. You can sometimes improve clogged injectors by adding a high-quality fuel injector cleaner to the tank. This typically costs around $10 to $20 per treatment and may clear organic deposits. However, chemical cleaners do not fix mechanical damage or electrical issues.
Impact of Heat and Mechanical Wear
Fuel injectors operate under high temperatures that can accelerate wear and tear on seals and internal components. The injector body may crack after prolonged exposure to heat, fuel, and moisture, allowing leaks or corrosion. Heat causes plastic and rubber parts to degrade, leading to fuel leaks or erratic spray patterns.
Mechanical wear also results from millions of cycles opening and closing the injector needle valve. Over 100,000 miles, this wear increases the chance of injector sticking or leaking. Regular engine maintenance and using proper fuel can slow this breakdown but cannot prevent all mechanical failure. Cracked or damaged injectors typically require replacement, as repairs are not practical.
Effects of Fuel Quality on Injector Performance
Fuel quality matters greatly because impurities and additives can harm injectors or engine components. Low-quality fuel often contains sediments, water, and less refined hydrocarbons that increase injector clogging. Ethanol-blended fuels can absorb moisture, leading to corrosion inside the injector.
Maintaining good fuel quality by using reputable gas stations and avoiding old or contaminated fuel helps prolong injector life. Neglecting to do so risks poor combustion, injector malfunction, and higher emissions. High-mileage vehicles especially benefit from cleaner fuel and periodic injector cleaning treatments to keep fuel delivery consistent.
Electrical Faults and Injector Damage
Fuel injectors rely on electrical pulses to open and close properly. Faulty wiring, poor connections, or coil failure can prevent the injector from working as intended. Electrical issues often cause injectors to stay open or closed, resulting in too much or too little fuel entering the engine.
Because injectors often operate in groups, one electrical fault can disrupt multiple injectors. Diagnosing electrical problems involves checking the injector resistance with a multimeter, testing voltage supply, and inspecting connectors for corrosion or damage. Electrical failures typically mean the injector needs replacement, as cleaning does not restore electrical function.
Summary of Key Causes of Injector Failure
- Dirt, rust, and water contamination in fuel clog injector nozzles.
- Heat exposure causes injector body cracking and seal deterioration.
- Mechanical wear from constant valve cycling leads to sticking or leaking.
- Low-quality fuel with additives and sediments accelerates injector degradation.
- Electrical faults disrupt the injector’s ability to open and close properly.
- Corrosion inside injectors results from moisture absorption and fuel breakdown.
- Skipping fuel filter replacement increases contaminant buildup in injectors.
Being aware of these causes helps you decide when cleaning may fix minor clogs or when replacement is necessary due to mechanical or electrical failure.
5. How to Visually Inspect Fuel Injectors for Damage or Leaks
Visually inspecting fuel injectors involves locating them on your engine, checking the seals and O-rings for wear or damage, spotting fuel leaks outside the injector, and examining the wiring and connectors for corrosion or loose connections. These steps help confirm if a fuel injector is faulty and if replacement is needed.
Locating Injectors in Gasoline and Diesel Engines
Fuel injectors are typically mounted on or near the intake manifold or cylinder head, depending on your engine type. Gasoline engines with multi-point fuel injection have injectors inserted into the intake ports, while diesel injectors usually sit directly in the cylinder head, injecting fuel under high pressure into the combustion chamber.
On common V6 or V8 engines like the Chevrolet Suburban, injectors are arranged in a line on each bank close to the intake valves. Familiarize yourself with the engine layout by checking your vehicle’s repair manual or looking for a labeled diagram under the hood. Knowing exactly where the injectors are lets you visually inspect each one carefully without unnecessary disassembly.
Examining Injector Seals and O-Rings
Injectors use rubber O-rings or seals at both ends to prevent pressurized fuel or air leaks. These seals can become brittle, cracked, or flattened with age, leading to leaks or poor fuel atomization. Inspecting these components visually helps identify signs of wear before fuel leaks start.
- Park your vehicle on a level surface and let the engine cool completely to avoid burns.
- Locate each fuel injector on the engine and clear away any dirt or grime with a clean cloth for better visibility.
- Look closely at the O-rings where the injector meets the fuel rail and the intake manifold or cylinder head.
- Check for visible cracks, breaks, or flattening on the rubber seals.
- Look for residue like dampness, stains, or a strong fuel smell near the seals, which can indicate leaking fuel.
Wear safety gloves to avoid contact with any leaked fuel and prevent skin irritation during this inspection.
Checking for External Fuel Leaks
External leaks around fuel injectors are often obvious signs of a bad injector or faulty seals. Fuel leaks can cause strong fuel odors, poor engine idle, or risk of fire. Careful visual examination with good lighting is essential.
Look around the injector body and adjacent fuel line connections for wet spots or droplets, especially after the engine has run and pressurized the fuel system. Also, check the engine bay floor for fuel stains. Perform these steps to check for leaks:
- Turn off the engine and wait at least 15 minutes to let any fuel residue settle.
- Use a flashlight to carefully inspect around each injector and fuel line connection for fuel wetness or staining.
- Smell the intake manifold area for strong gasoline or diesel odor that may indicate a slow leak.
- Check the firewall and under the vehicle for any signs of dripping fuel or fuel pooling.
Never inspect fuel injectors while the engine is running or hot; fuel pressure can cause dangerous sprays or ignitions.
Inspecting Electrical Connectors and Wiring
Fuel injectors rely on electrical signals from the engine control unit to open and close. Faulty wiring or connectors can cause injectors to malfunction. Inspect the wiring harness carefully for damage or corrosion. Steps for electrical inspection:
- Locate the electrical connector on each injector, usually clipped on the top or side.
- Gently disconnect the connectors and inspect the pins for corrosion, bent terminals, or debris.
- Examine the wiring harness for cracks in insulation, exposed wires, or signs of overheating such as melting or discoloration.
- Reattach the connectors firmly, ensuring they snap into place fully to maintain a good electrical connection.
- Consider testing injector continuity with a multimeter if you suspect electrical issues.
Damage such as severe corrosion, broken wires, or burnt connectors usually requires replacement of the wiring or injector harness to restore proper fuel injector operation.
6. Cost and Lifespan: When to Repair or Replace Fuel Injectors
Fuel injectors generally last between 50,000 and 100,000 miles, with many designed to function well beyond 100,000 miles if properly maintained. The decision to repair or replace them depends on the injector’s condition, vehicle mileage, and cost considerations. Cleaning fuel injectors can be a cost-effective interim solution but may not always restore full performance, especially if physical damage or major clogging exists.
Costs vary widely. A single fuel injector part can cost anywhere from $50 to more than $300, depending on make and model. Labor costs can significantly increase your total expense. Choosing to replace the parts yourself, the entire set could cost between $600 and $1,200. Professional replacement of all injectors typically costs between $800 and $1,450. Replacing injectors in banks rather than individually is common because it promotes even wear and consistent engine performance.
| Service Type | Cost Range (Parts Only) | Estimated Labor Cost | Total Estimated Cost |
|---|---|---|---|
| Single Injector Replacement | $50 – $300+ | $100 – $200 | $150 – $500+ |
| Full Set Replacement (Self-replacement Parts) | $600 – $1,200 | $0 | $600 – $1,200 |
| Full Set Replacement (Professional) | $600 – $1,200 | $200 – $250 | $800 – $1,450 |
| Fuel Injector Cleaning (Professional) | $50 – $100 per injector | $50 – $100 | $100 – $200 per injector |
Choosing cleaning over replacement can save money if your injectors only show mild clogging without leaks or physical faults. Cleaning restores injector spray patterns and flow rates but may not be effective if significant internal damage is present. When cleaning does not fix engine performance problems, replacing the parts is the next step and often a better long-term investment. Replacing all injectors or at least a bank at once can prevent uneven wear and avoid repeated shop visits.
Careful diagnostics including fuel system readings, ignition data, and injector function tests help decide whether repair or replacement is more economical for your specific situation. You can expect to save several hundred dollars by clearly identifying the faulty injector and choosing the correct service based on actual performance issues rather than guesswork.
7. Safety Precautions and Common Pitfalls When Testing Injectors
Fuel injectors handle pressurized gasoline and electrical currents, which creates obvious hazards during diagnosis or replacement. Gasoline is highly flammable, so never work near open flames or sparks. Always disconnect the vehicle’s battery before touching fuel systems to avoid electrical shocks or accidental injector activation. Depending on the vehicle, fuel pressure in the system can exceed 50 psi, so relieve it properly by following the manufacturer’s recommended steps. Failure to do so can result in fuel spray, which poses a fire risk and can cause injury.
Protect yourself with safety glasses and gloves to avoid fuel contact with skin and eyes. Make sure the work area is well ventilated to minimize inhaling vapors, and keep a fire extinguisher rated for flammable liquids nearby. When removing injectors, handle them gently; excessive force can damage their delicate internal components. Avoid using metal tools that might scratch or deform injector bodies or electrical connectors, damaging their seals and causing leaks or electrical faults later.
False test results often come from simple errors like failing to isolate individual injectors or neglecting to perform tests on a warm, properly prepared engine. The vehicle should be off, cooled down unless a warm engine temperature is specified, and the fuel system pressure ideally reduced following safe procedures. Testing fuel injectors while the engine is running is hazardous and can damage the equipment if done without proper training and tools.
Before inspecting or testing injectors, disconnect the negative battery terminal and depressurize the fuel system according to the vehicle manual. Clean around each injector to reduce dirt contamination. Record and test each injector identically to ensure consistent results and avoid confusion. The electronic control unit (ECU) also controls injector pulses, so check for ECU faults if injector tests don’t match symptoms.
- Always wear eye protection and gloves when handling fuel injectors
- Disconnect the battery and relieve fuel pressure before removal or testing
- Work in a well-ventilated area free of ignition sources
- Use plastic or rubber tools to avoid damaging injector components
- Test all injectors the same way to get comparable, reliable results
- Verify wiring integrity to prevent misdiagnosis caused by electrical issues
- Prepare the vehicle by cleaning injector areas and following proper shutdown steps
Ignoring these precautions increases the risk of injury or additional vehicle damage. Damage to injectors during handling will cost between $50 and $150 per injector in parts alone, not including installation labor. Incorrect testing techniques may send you chasing the wrong problems, raising repair costs unnecessarily. Taking the time to prepare safely and carefully interpret test results helps ensure a successful diagnosis and reduces the chances of repeat visits to the shop.
8. When to Call a Professional Mechanic for Fuel Injector Issues
Professional help becomes necessary when fuel injector problems go beyond basic testing and cleaning. Issues involving electrical components, such as wiring faults or failures within the injector coil, require advanced diagnostic equipment to isolate the exact cause. Mechanics use tools like scanners to read error codes from the engine control unit (ECU) and perform cylinder drop tests that differentiate injector malfunctions from other engine problems. These methods provide clear insights that DIY tools often cannot offer.
Fuel system cleaning services from professionals are recommended when injectors are heavily clogged and simple cleaning attempts fail. A professional cleaning machine uses pressurized solvents that effectively dissolve deposits inside the injector without risking damage to delicate internal parts. This process typically costs between $50 and $150, depending on the vehicle and service provider, and can prevent the need for costly replacements.
Electrical testing by a mechanic is important if injector wiring or ECU problems are suspected. A test light or multimeter checks voltage and continuity in the injector’s wiring harness. If one wire consistently shows proper voltage but the injector still malfunctions, the issue may lie inside the injector itself or with the ECU’s control signals. These diagnosis steps require skill and equipment that most DIYers do not have.
Attempting repairs on high-pressure fuel systems or electronic injection controls without professional training poses safety risks and may cause more damage. Fuel injectors operate under pressures often exceeding 40 psi, and incorrect handling can lead to leaks or fires. Faulty diagnostics can also lead to unnecessary part replacements or worsen engine performance.
- Advanced diagnostic equipment is needed for pinpointing wiring, ECU, or injector coil failures.
- Professional cleaning services handle severe clogging with solvents and pressurized machines.
- Mechanics perform cylinder drop tests to confirm injector-caused misfires.
- Electrical tests verify voltage and continuity in wiring harnesses connected to injectors.
- DIY repairs are risky when dealing with high-pressure fuel or complex electronics.
- Cost for professional cleaning ranges from $50 to $150 depending on location and vehicle.
- A mechanic’s evaluation ensures targeted solutions avoiding unnecessary replacement parts.
Do not attempt to unplug or spray fuel injectors without relieving fuel system pressure first to avoid injury or fire risk.
Professional mechanics have the necessary tools and expertise to interpret diagnostic results and decide whether cleaning, repair, or replacement is the best course of action. When injector problems involve engine management coordination and electronic controls, this expert input prevents costly mistakes and promotes reliable engine performance over time.
Step-by-Step Action Plan to Diagnose and Address Fuel Injector Problems
Follow these steps to quickly identify and decide on the right fix for your fuel injector issues.
- Before you start: Check for common symptoms like rough idle, poor acceleration, or increased fuel consumption to confirm injector problems.
- Day 1: Perform a visual inspection of the injectors for leaks or damage; no visible issues means continue testing.
- Day 2: Use a multimeter to test injector resistance and compare it to manufacturer specifications; out-of-range readings indicate a faulty injector.
- Day 3: Conduct a fuel injector pulse test with a noid light or a similar tool to verify the injector is receiving signals; no pulse means an electrical issue.
- Day 4: Try a fuel injector cleaning treatment if clogging is suspected and monitor for improved performance after a short drive.
- Day 5: If problems persist, decide whether to repair or replace injectors based on cost estimates and vehicle age.
- Day 6: If uncertainty remains or problems continue, schedule a professional mechanic visit for advanced diagnostics and repair.
Frequently Asked Questions
How Much Does It Usually Cost to Replace a Fuel Injector?
Replacing a fuel injector typically costs between $150 and $300 per injector, including parts and labor. Prices vary by vehicle model and mechanic rates, so shop around for accurate estimates.
Can a Bad Fuel Injector Cause a Misfire Code?
Yes, a bad fuel injector can trigger a misfire code by causing uneven or insufficient fuel delivery. However, other issues like spark plugs or wiring can also cause misfires.
Can Fuel Injectors Be Cleaned?
Fuel injectors can sometimes be cleaned to remove deposits and improve flow, but cleaning won’t fix mechanical damage. Use injector cleaner additives or professional cleaning services for partial restoration.
What Is the Lifespan of Fuel Injectors?
Fuel injectors usually last 50,000 to 100,000 miles but can fail sooner due to poor fuel quality or lack of maintenance. Regular fuel system care can extend their service life.
Can a Bad Fuel Injector Cause Black Smoke from the Exhaust?
Yes, a leaking or stuck open injector can cause black smoke by flooding the engine with excess fuel.
How Do I Know If a Fuel Injector Is Leaking?
You might notice fuel odors, wet spots around the injector, or poor fuel economy indicating a leak.
Wrapping Up
Fuel injector problems can cause a range of symptoms that affect vehicle performance and fuel efficiency. Testing and inspection at home help determine if cleaning, repair, or replacement is needed. Start with the simplest checks and move toward professional help if issues persist or electrical faults appear. Taking timely action keeps your engine running smoothly and prevents more costly repairs down the road.


