How to Stop Tonneau Cover Leaking Step by Step
To stop your tonneau cover from leaking, first inspect seams, seals, and clamps for damage or gaps.
Clean the cover and seals with mild soap, then dry thoroughly.
Replace any cracked or brittle seals and apply vinyl sealant to patch holes or tears.
Adjust the cover for a snug fit using clamps or tensioners.
Finally, test by spraying water over seams and check for leaks.
Following these steps closely will help protect your truck bed effectively and keep moisture out.
Key Takeaways
- Inspect seams, seals, and cover material for damage, tears, or misalignment causing leaks.
- Clean the cover and seals thoroughly, replacing any cracked or brittle seals for a secure fit.
- Apply vinyl sealant or adhesive to patch cracks, tears, and gaps, ensuring surfaces are clean and dry.
- Adjust and tighten clamps, fasteners, and tensioners to achieve an even, snug cover fit.
- Test for leaks by spraying water over seams and inspecting underneath; maintain regularly and replace if needed.
How to Identify If Your Tonneau Cover Is Leaking
If you want to know whether your tonneau cover is leaking, start by inspecting the truck bed after it rains or after washing. Look closely for puddles, damp spots, or water stains, which are clear signs of leaks.
Pay attention to any rust or mold forming on the bed surface or cover, as these indicate ongoing moisture exposure. Next, run a hose over the cover, focusing on the edges and seams where the seals are critical. Watch underneath for any water drips or seepage that reveal water intrusion.
Don’t forget to check for musty odors or visible mold, which suggest trapped moisture inside or around the cover. Finally, examine the cover’s material and seams carefully for tears, punctures, or misalignments that could compromise the seals and allow water in. By doing these checks, you’ll quickly identify if your tonneau cover is leaking and where water intrusion is occurring.
Common Causes of Tonneau Cover Leaks
After pinpointing signs of leakage, understanding what commonly causes tonneau covers to fail can help you address the problem effectively. Leaks often result from issues that compromise the cover’s ability to form a tight waterproof seal. Here are the main causes you should watch for:
- Tears, punctures, or holes in the cover material allow water to seep through, creating leaks.
- Loose or broken clamps and snaps cause gaps along the edges, breaking the seal and letting water in.
- Misaligned cover panels or rails create openings where water can enter during rain or washing.
- Dirt, debris, and buildup along seams prevent seals from closing properly, leading to leaks.
Worn or damaged seals lose flexibility over time, so even small gaps can let moisture through. By recognizing these common causes, you’ll be better equipped to stop leaks before they worsen.
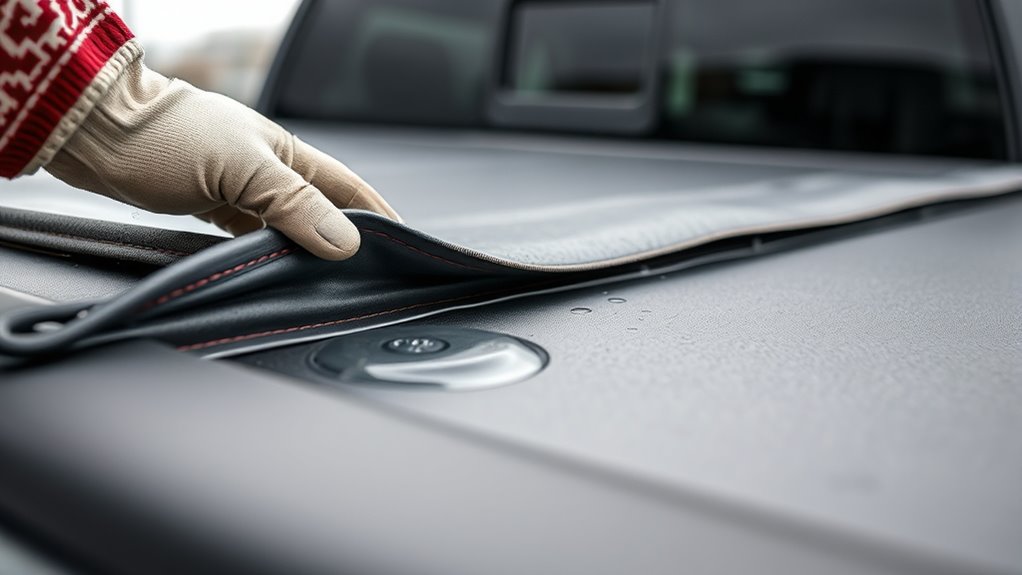
Inspect Your Tonneau Cover and Seals for Damage
Though leaks can stem from various issues, the first step is to thoroughly inspect your tonneau cover and seals for any visible damage. Start by examining the entire cover surface, paying close attention to seams and folds where cracks, tears, or punctures often appear.
Then, inspect the rubber seals along the edges for signs of wear, cracks, or deformation that could weaken their waterproofing ability. Don’t forget to check for frayed stitching or warping on hard covers, as these defects may create gaps allowing water in.
Also, look for sun damage like brittleness or fading, which can degrade the cover material over time. If you find any damage to the seals or cover, replace or repair those parts promptly.
Keeping your tonneau cover and seals in good condition is essential to maintaining a tight, water-resistant barrier and preventing leaks effectively.
How to Clean Your Tonneau Cover and Seals Properly
Maintaining your tonneau cover’s waterproof seal involves more than just spotting damage. It requires regular cleaning to keep dirt and grime from compromising the material. To properly clean your tonneau cover and seals, follow these steps to preserve their waterproofing and flexibility:
- Use a soft cloth with mild soap to gently clean the cover and seals, removing dirt and debris without damaging the surface.
- Rinse thoroughly with clean water to wash away all soap residues that could degrade the material over time.
- Dry the cover and seals completely using a microfiber towel to prevent mold growth and water spots.
- While cleaning, inspect the seals for cracks or damage to ensure they maintain their waterproofing effectiveness.
When to Replace Worn Seals and How to Do It
You’ll want to replace your seals if you notice any cracks, tears, or if they’ve become brittle or started to pull away from the frame. First, give the area a good clean to make sure there’s no dirt or debris. Then, press the new, high-quality seals firmly into place so they fit snugly. Doing this will help keep your tonneau cover watertight and free from leaks.
Signs Of Seal Wear
How can you tell when your tonneau cover seals need replacing? Watch for clear signs of seal wear to prevent water infiltration and further damage. Regularly inspecting your seals helps catch issues early before leaks worsen.
Look out for these four key indicators:
- Cracks, brittleness, or deformation that reduce flexibility and waterproofing.
- Visible gaps or tears in the rubber seal showing deterioration.
- Seal pulling away from edges or seams, indicating failed adhesive or aging material.
- Any moisture or water pooling near the seal during or after rain.
Noticing these signs means it’s time to replace your seals to maintain a tight, waterproof barrier and protect your truck bed from water damage.
Stepwise Seal Replacement
Although seal wear might seem minor at first, replacing worn or cracked rubber seals immediately prevents water from seeping into your truck bed. Start by carefully removing the damaged seals, then clean the area thoroughly to guarantee a smooth surface for the new ones.
Always choose manufacturer-recommended replacement rubber seals that fit precisely for a reliable waterproof barrier. Press the new seals firmly into their grooves, making sure they sit flush without any gaps.
After installation, regularly inspect your rubber seals for signs of brittleness or wear and replace them promptly to maintain the waterproof integrity of your tonneau cover. Following this stepwise seal replacement process keeps your truck bed dry and protected from leaks effectively.
How to Patch Small Tears and Holes in Your Cover
First, give the damaged area a good cleaning and make sure it’s completely dry before you start patching. You don’t want any moisture trapped underneath. Then, grab a patch kit with marine-grade vinyl that’s a bit bigger than the tear or hole. Press it down firmly so it sticks well.
After that, seal around the edges with waterproof adhesive to keep water from sneaking in. Let everything cure fully before you put your cover back outside. This way, your patch will hold up against the elements!
Clean Damage Area
Before you apply any patch to your tonneau cover, you’ll need to thoroughly clean the damaged area with mild soap and water. This step is essential to remove dirt and debris that can interfere with the patch’s adhesion and seal. Once clean, let the area dry completely for the best results.
Follow these steps to prepare the damage area properly:
- Use mild soap and water to clean the damage thoroughly.
- Rinse off all soap residue and dirt.
- Allow the area to air dry completely.
- Inspect the cleaned area to confirm no dirt or moisture remains.
Taking time to clean and dry the damage area properly helps the patch and sealant bond securely. This prevents leaks effectively.
Apply Patch Kit
A proper patch kit can quickly restore your tonneau cover’s waterproof integrity after small tears or holes. First, clean the damage area thoroughly and let it dry. Cut your patch larger than the tear, with at least a 1-inch margin.
Press the patch firmly onto the damage, smoothing out bubbles for full contact. Apply vinyl sealant around the patch edges to reinforce adhesion and waterproofing. Let the sealant cure as instructed before exposing your cover to water.
| Step | Action |
|---|---|
| Clean Damage | Wash and dry the affected area |
| Cut Patch | Ensure patch is 1 inch larger than tear |
| Apply Patch | Press firmly, smooth wrinkles |
| Seal Edges | Use sealant around the patch perimeter |
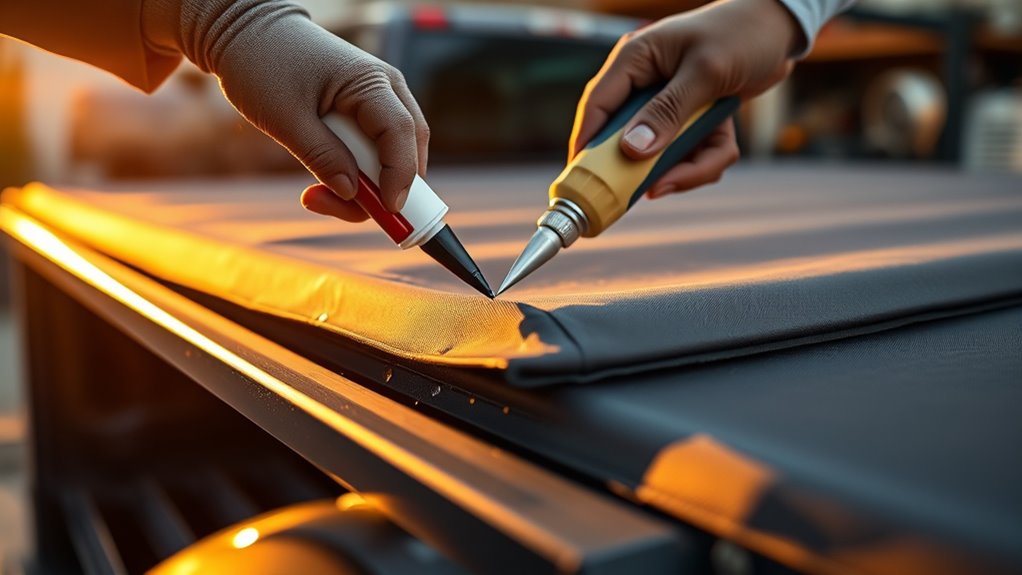
Seal Patch Edges
Once you’ve firmly applied the patch over the tear, sealing the edges properly will keep water from sneaking underneath. This step is essential for effective waterproofing.
Follow these steps to seal patch edges:
- Clean the area around the patch with mild soap and water, then dry it completely.
- Apply a vinyl sealant or adhesive generously around all patch edges.
- Smooth the sealant to ensure full contact and no gaps.
- Let the sealant cure fully as per the manufacturer’s instructions before exposing the cover to moisture.
Using sealant around the patch edges reinforces the repair, preventing leaks and extending the lifespan of your tonneau cover. Proper sealing ensures your patch stays secure and waterproof under all conditions.
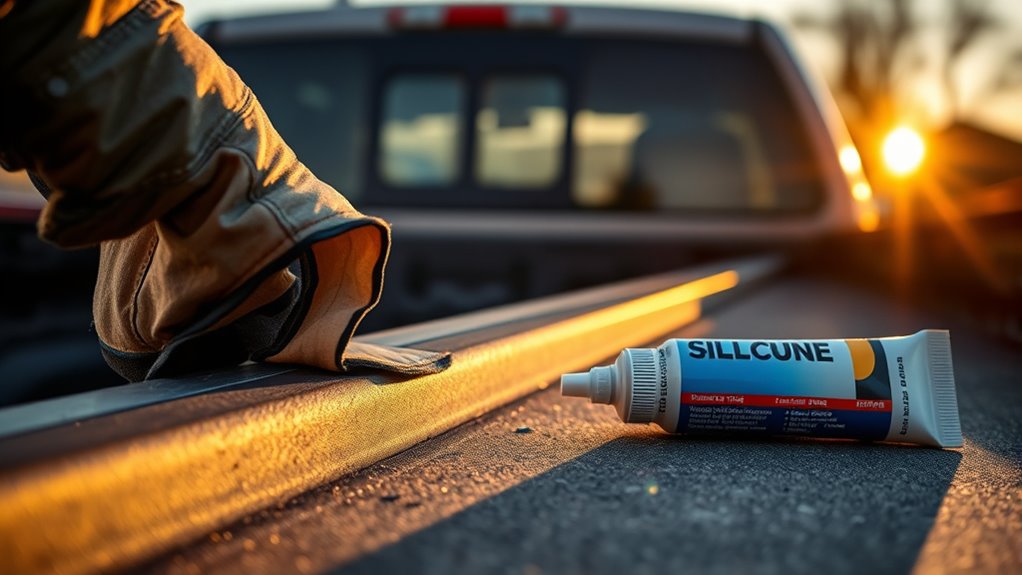
Using Sealants to Stop Tonneau Cover Leaks
When you want to stop your tonneau cover from leaking, applying a silicone-based sealant along its edges and seams creates a reliable waterproof barrier. First, make sure the surface is clean and dry to help the sealant adhere properly and prevent future leaks.
Use a caulking gun for an even, precise application, focusing on filling any gaps, tears, or damaged areas thoroughly. This approach ensures the sealant forms a continuous waterproof layer that keeps water out.
After applying, allow the sealant to cure fully, following the manufacturer’s instructions before exposing the cover to rain or washing. Over time, inspect the sealant for cracks or wear, and reapply it as needed to maintain a solid waterproof seal.
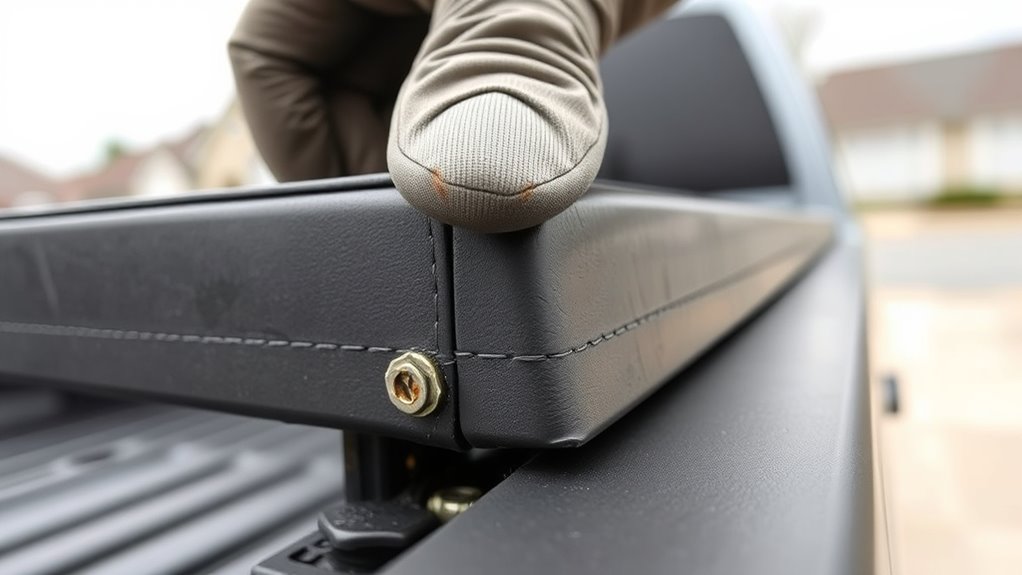
How to Adjust Your Tonneau Cover for a Better Fit
Applying sealant can greatly reduce leaks, but fitting your tonneau cover properly is just as important to keep water out. To adjust your cover for a better fit, start by loosening the clamps or fasteners so you can reposition it. Then, pull the cover taut across the truck bed, making sure it’s evenly aligned on both sides.
As you tighten the clamps, maintain even tension to avoid sagging or gaps. If your cover has adjustable rails or tensioners, use them to fine-tune the fit for a snug seal. Here’s how to do it step-by-step:
- Loosen clamps or fasteners to allow adjustment.
- Pull the cover tight and ensure even alignment.
- Gradually tighten clamps, keeping tension consistent.
- Use adjustable rails or tensioners for a perfect fit.
Taking these steps ensures your tonneau cover fits securely, reducing leaks and protecting your truck bed effectively.
How to Test Your Repairs for Leaks
To test your repairs, start by spraying water thoroughly over the tonneau cover. Make sure you focus on the seams and edges since those are the spots most likely to leak. Keep a close eye underneath the cover for any moisture that might show up—that’s your clue that water is getting in.
It helps to use a flashlight while you’re checking, especially in those hard-to-see areas. That way, you won’t miss any sneaky water intrusion during the process.
Spray Water Thoroughly
Even if you’ve carefully sealed every seam, you’ll want to spray water thoroughly over the entire tonneau cover to test your repairs. This step helps you spot any leaks before they cause damage. Use a hose with a gentle spray nozzle and focus on repaired areas.
Here’s how to inspect effectively:
- Spray water evenly, simulating rain, over the whole cover, especially seams and seals.
- Spray from different angles to cover all potential leak spots.
- Observe underneath the cover while spraying to catch any water seeping through.
- After spraying, wait a few minutes, then inspect the truck bed for damp spots or drips.
Check Edges And Seams
While checking your tonneau cover for leaks, focus closely on the edges and seams where water often finds its way through. Spray water directly along these areas and watch carefully for any signs of seepage.
Use a flashlight to inspect the seams for cracks, tears, or places where the seal might have pulled away, compromising waterproofing. After wetting the cover, look underneath for damp spots or puddles that reveal leaks.
Reapply water at different angles and pressure to guarantee your repairs hold under varying conditions. Finally, briefly expose the cover to sunlight to spot moisture or droplets that might be hard to detect in low light.
This thorough check of edges and seams helps confirm your waterproofing efforts are effective.
Observe Moisture Accumulation
Although you’ve sealed the edges and seams, you’ll want to observe moisture accumulation carefully to verify your repairs truly hold up. Conducting a thorough water test helps identify any hidden water seepage and confirms the effectiveness of your work. Follow these steps:
- Briefly expose the repaired cover to sunlight and look for signs of moisture accumulation.
- Spray water from different angles over the repaired areas, then check underneath for water seepage.
- Use a dry cloth or paper towel around seams and edges to detect any dampness.
- Monitor the truck bed for several minutes after spraying to catch any slow leaks.
Repeat this process periodically to ensure your tonneau cover remains leak-free over time.
Maintenance Tips to Prevent Future Tonneau Cover Leaks
To keep your tonneau cover leak-free, you should regularly inspect and clean the seals and rubber gaskets to maintain their flexibility and prevent cracks. Dirt and debris can build up and weaken the seals, so give them a thorough cleaning during your maintenance routine.
Applying a silicone-based lubricant to the seals and moving parts helps keep them pliable and guarantees a watertight barrier. Don’t forget to check and tighten clamps, fasteners, and tension systems to keep the cover snug and properly aligned, which reduces leaks.
When you’re not using the cover, store it in a shaded or protected area to prevent sun damage that can cause brittleness. Consistent maintenance like this not only prevents leaks but also extends the life of your tonneau cover, saving you time and money in the long run.
Keep these tips in mind to protect your investment and enjoy a leak-free cover year-round.
Signs You Need to Replace Your Tonneau Cover
If you notice visible cracks, tears, or holes in your tonneau cover, it’s a clear sign that replacement is necessary. These damages allow leaks and show material deterioration that repairs can’t fix. You should also watch for other signs that your cover has reached the end of its life.
Here are 4 key signs you need to replace your tonneau cover:
- Warped or dented cover that no longer fits snugly, compromising waterproofing.
- Persistent leaks despite multiple repair attempts, showing advanced deterioration.
- Faded, stiff, or brittle vinyl or fabric, signaling material breakdown.
- Rusted or damaged hardware preventing a secure fit, often requiring a full cover replacement.
Additional Resources for Tonneau Cover Care and Repair
Recognizing when your tonneau cover needs replacing is just one part of keeping it leak-free. To maintain your cover effectively, consult manufacturer guides and online tutorials for step-by-step instructions on fixing holes or tears.
You’ll find replacement parts like seals and clamps at specialized retailers, which help restore your cover’s performance. Investing in maintenance kits designed specifically for truck bed covers can prolong your cover’s lifespan by simplifying cleaning and upkeep.
When leaks persist despite your efforts, don’t hesitate to seek professional repair services or visit authorized dealerships. Experts can provide thorough assessments and quality repairs that DIY methods might miss.
Furthermore, reading product comparisons and user reviews can guide you in selecting top-rated replacement parts and accessories, ensuring long-term leak prevention. With these resources, you’ll keep your tonneau cover in top shape, protecting your truck bed efficiently and confidently.
Frequently Asked Questions
Can a Tonneau Cover Leak Cause Damage to My Truck Bed?
Yes, a tonneau cover leak can definitely cause damage to your truck bed. Water can lead to rust, corrosion, and even mold growth if you don’t act fast.
Using proper waterproofing techniques and applying the right sealant types helps prevent leaks. Staying on top of maintenance tips, like regularly checking seals and cleaning the cover, will protect your truck bed and keep it in great shape longer.
Are There Specific Weather Conditions That Worsen Tonneau Cover Leaks?
Yes, weather-related issues definitely worsen tonneau cover leaks. When you face rain exposure, water pressure increases, pushing water through any weak spots.
Temperature impacts cause the cover’s materials to expand and contract, leading to cracks in seals that let water in. You’ll also notice that strong winds can lift or gap the cover, making leaks worse.
How Do Different Tonneau Cover Materials Affect Leak Prevention?
You’d think a tonneau cover could survive a hurricane, but material durability really makes all the difference in leak prevention. Hard covers with rubber seals offer the toughest defense, while soft covers need precise installation techniques to minimize gaps.
Thermoplastic blends strike a balance but require regular maintenance to keep seals tight. If you skip upkeep or install poorly, even the best materials won’t stop leaks, so focus on quality and care.
Can I Use Household Products to Waterproof My Tonneau Cover?
Yes, you can use household remedies like beeswax, petroleum jelly, or a baking soda paste for DIY sealing on your tonneau cover. Waterproof sprays meant for fabric can offer temporary water resistance, but they’re usually less durable than specialized products.
If you want longer-lasting protection, it’s best to combine household remedies with proper waterproof sprays designed for outdoor use. This way, you’ll improve sealing without risking damage.
Will a Leaking Tonneau Cover Affect My Vehicle’s Warranty?
A leaking tonneau cover usually won’t affect your vehicle’s warranty unless it causes damage inside, like to electronics or upholstery. You should review warranty concerns carefully because manufacturer policies often exclude coverage if the cover was installed improperly or modified.
Coverage exclusions also apply if leaks result from your repairs. To avoid surprises, check your warranty details and contact the dealer to understand how your tonneau cover’s leak might impact your vehicle’s warranty.
Conclusion
If you don’t address tonneau cover leaks, up to 40% of your truck bed’s cargo could get damaged over time due to water exposure. By regularly inspecting, cleaning, and replacing worn seals, you’ll keep your gear dry and protected.
Don’t wait for major damage. Take action now with these simple steps. Proper maintenance not only stops leaks but also extends your cover’s life, saving you money and hassle in the long run.