Can Am X3 Shocks Explained: Upgrade Options, Benefits, and Installation Tips
Can Am X3 shocks control your Maverick’s ride quality by absorbing impacts and maintaining tire contact with the terrain. Upgrading these shocks improves handling, comfort, and durability during aggressive off-road driving. Start by identifying your current shocks’ type and condition to select upgrades that match your riding style and terrain demands.
Key Takeaways
- OEM Can-Am X3 shocks are tuned for general use, while aftermarket options offer improve adjustability and performance for specific conditions.
- Internal bypass shocks provide more consistent damping by directing fluid through multiple channels inside the shock body.
- Adjustable sway bar links with teflon-lined 5/8″ rod ends improve durability and suspension tuning flexibility over standard 1/2″ rod ends.
- Limit strap kits prevent overextension of shocks, protecting them from damage during extreme suspension travel.
- Dual rate spring kits improve shock performance by providing progressive spring resistance suited for varied terrain and load.
- Choose upgrades based on your Maverick X3’s model and shock series to ensure proper fit and function.
What Are Can-Am X3 Shocks and How Do They Work?

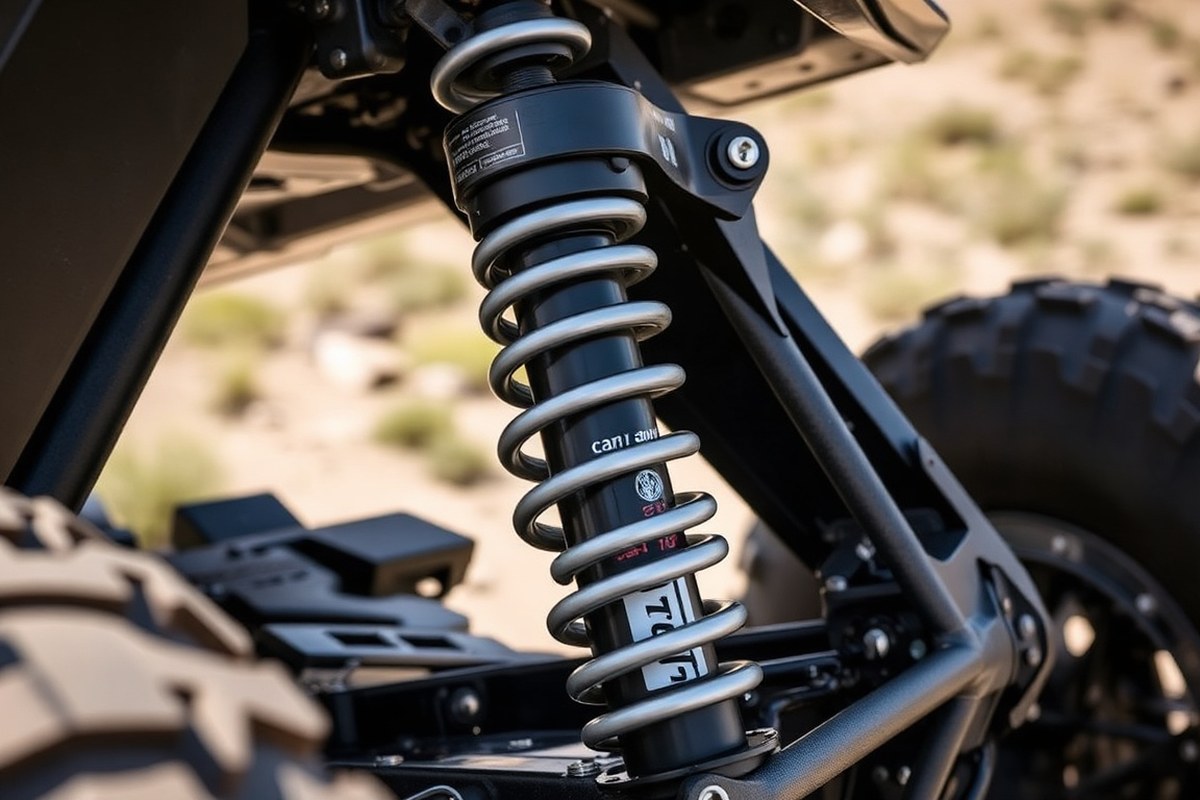
Can-Am X3 shocks are high-performance suspension components designed specifically for the Can-Am Maverick X3 off-road vehicle. These shocks control the up-and-down movement of the wheels and absorb impacts from rough terrain, protecting both the vehicle and the rider. Inside each shock, you’ll find a spring, a piston, hydraulic fluid, and seals. The spring provides the initial resistance to compression, while the piston moves inside the shock body, pushing fluid through small valves to control the speed of the suspension’s movement.
The shocks play a major role in handling and ride quality. By controlling wheel movement, they keep the tires in contact with the ground, improving traction and stability during high-speed off-road runs or tight cornering. Shock absorbers also reduce body roll, which can improve rider confidence and safety. On rough trails, proper shocks soften impacts to prevent a harsh jolt from transferring directly to you or the vehicle’s frame.
In operation, when your Maverick X3 hits a bump, the shock compresses as the wheel moves upward, compressing the spring and forcing hydraulic fluid through internal valves. This process slows down the shock’s compression and rebound, preventing the vehicle from bouncing uncontrollably. Without effective shocks, the ride would be unstable and uncomfortable, making control difficult, especially on technical terrain.
Upgrading or maintaining your shocks requires attention to their specific parts and function. For example, dual rate spring kits, available for roughly $750, change spring stiffness at different compression levels, giving a smooth ride on small bumps while stiffening up for larger impacts. Limit strap kits priced around $270 help reduce shock travel to prevent overextension and damage. These accessories improve how shocks work, extending their lifespan and tuning ride characteristics.
The quality of shocks also matters. Most Can-Am Mavericks come with Fox or Showa shocks, designed for balance between plush ride quality and durability. Shock packages with race-proven internals provide improved adjustability and precision control, translating into more predictable handling on aggressive trails. Poor or worn shocks cause excessive bouncing, decreased traction, and can stress suspension parts, ultimately risking breakage and unsafe riding conditions.
To keep shocks working properly, monitor them for signs of oil leaks, damaged seals, or reduced damping performance. Properly functioning shocks should compress and rebound smoothly with noticeable but controlled resistance. Regular service by a professional or following manufacturer guidelines can help maintain performance and ride quality, especially if you use your Maverick X3 in demanding off-road environments.
Common Types of Can-Am Maverick X3 Shocks Available

Can-Am Maverick X3 owners can choose from several shock types including OEM shocks, Fox shocks, Showa shocks, and specialized options like internal bypass shocks and dual rate springs. Each performs differently depending on your riding style and terrain. Below is a detailed look at these common shock types and a table of shock series suitable for various X3 models.
Fox Shocks Features and Benefits
Fox shocks are known for their patented internal bypass technology, which provides position-sensitive damping. This means the shock adjusts damping force automatically depending on how far it compresses, improving both ride comfort and control over rough terrain. For Maverick X3 riders tackling aggressive trails or racing conditions, Fox shocks offer superior performance and durability.
With internal bypass shocks, you get multiple damping zones within the same shock, offering a soft initial stroke for small bumps followed by firmer resistance for big hits. Fox offers front shocks in the 2.5 Internal Bypass series and rear shocks in the 3.0 Internal Bypass series for Can-Am Maverick X3 models, allowing precise tuning for suspension travel and terrain variations.
Showa Shock Characteristics
Showa shocks are another high-quality suspension choice for the Can-Am Maverick X3. They typically provide a solid balance between comfort and control, focusing on reliable construction and consistent damping. Showa shocks perform well for riders seeking stable handling on varied trails without sacrificing durability.
Unlike Fox’s internal bypass system, Showa shocks generally use conventional monotube or twin-tube designs. They are favored for their smooth response and are frequently equipped on OEM or near-OEM setups for a dependable factory-style ride. Showa shocks may also be easier to maintain or rebuild due to their simpler construction.
OEM Shock Overview
The original equipment manufacturer shocks on the Can-Am Maverick X3 come pre-installed and calibrated to fit a wide range of riding conditions. They provide a solid baseline suspension experience with reliable performance on most terrain types. OEM shocks typically use twin-tube or monotube designs and may vary by model year and trim level.
Choosing OEM shocks can be cost-effective compared to premium aftermarket options. However, they might not offer the advanced features like internal bypass or adjustable dual-rate springs available from brands like Fox or specialized aftermarket kits. Retaining OEM shocks suits riders focused on everyday trail riding and occasional off-road adventures without demanding full race-spec suspension.
| Shock Series | Position | Type |
|---|---|---|
| 2.5 Internal Bypass | Front | Internal Bypass |
| 3.0 Internal Bypass | Rear | Internal Bypass |
The table shows the Shock Therapy Can-Am Maverick X3 internal bypass shock series recommended for front and rear positions. Selecting the correct size ensures compatibility with your model and maintains suspension travel and handling characteristics optimized by the manufacturer.
Tip: Always confirm the fitment of shocks with your specific Can-Am Maverick X3 model year and trim to avoid issues like incorrect length or mounting points, which can impair suspension performance.
Differences Between OEM and Aftermarket Can-Am X3 Shocks
OEM shocks for the Can-Am Maverick X3 provide reliable baseline performance tailored to specific models, while aftermarket shocks offer improve features such as improved adjustability and durability. Aftermarket options are often compatible across a wider range of Maverick X3 variants but require verification for fit and function. Upgrading shocks can improve ride quality and handling but involves higher upfront costs and varying warranty terms.
Durability and Materials
OEM Can-Am X3 shocks typically use high-quality materials optimized for stock conditions and warranty coverage. These shocks undergo rigorous testing to meet Can-Am’s specifications for durability under normal trail and light racing conditions. However, aftermarket shocks often feature advanced materials like billet aluminum bodies and high-grade seals, which resist wear and heat better during aggressive off-road use.
Aftermarket shocks generally handle increased abuse from jumps, rough terrain, and extended racing more effectively. This improved durability stems from reinforced piston rods, upgraded bushings, and coatings that reduce corrosion. Users pushing their Maverick X3 hard in diverse environments will find aftermarket shocks hold up longer, reducing the frequency of rebuilds or replacements.
Performance and Adjustability
OEM Can-Am Maverick X3 shocks come with fixed valving and limited adjustability, focusing on a balanced ride suitable for a broad user base. This limits tuning options for varied terrain or rider preferences. In contrast, aftermarket shocks offer multiple adjustment points, such as compression, rebound, and preload tuning, allowing customization for specific trail conditions, rider weight, and riding style.
Many aftermarket shocks include features like remote reservoirs and adjustable nitrogen charges that contribute to consistent damping performance under heat and heavy use. This leads to better control during high-speed cornering and rough impacts. Adjustability makes these shocks preferable for racers or dedicated trail riders looking to optimize their Maverick X3’s handling and comfort.
Cost and Warranty Differences
Replacing OEM Can-Am X3 shocks usually costs between $500 and $900 per shock, depending on the specific model. Aftermarket shocks can cost from $800 to over $1,500 each, reflecting their advanced capabilities and specialized construction. This higher price includes materials, improve performance features, and sometimes a longer lifespan.
OEM shocks come with a manufacturer warranty of typically 1 year or 12 months of use. Aftermarket warranties vary widely; some brands offer extended coverage of 2 or more years if installed by a certified technician, while others have limited warranties or require professional maintenance for claim eligibility. Understanding warranty terms is key before upgrading. The following table outlines compatibility of common Can-Am Maverick X3 models with OEM and aftermarket shocks:
| Can-Am Maverick X3 Model | Year Range | OEM Shock Compatibility | Aftermarket Shock Compatibility |
|---|---|---|---|
| MAX X DS Turbo RR 64 | 2022+ | Yes (Factory Fit) | Yes (Verify fitment per brand) |
| X RC Turbo | 2018-2021 | Yes (Factory Fit) | Yes (Many options compatible) |
| X RC Turbo R | 2018-2020 | Yes (Factory Fit) | Yes (Check adjustments availability) |
| X RC Turbo RR | 2020-2021 | Yes (Factory Fit) | Yes (Fitment varies by manufacturer) |
Confirming compatibility with your Maverick X3’s model and year is important before purchasing aftermarket shocks. Some require specific mounting hardware or shock lengths, while others fit directly as bolt-on replacements. Professional installation helps ensure proper function and preserves warranty coverage when upgrading.
Understanding Adjustable Sway Bar Links and Their Benefits
Adjustable sway bar links are metal rods that connect the sway bar to your Can-Am Maverick X3’s suspension arms. They allow you to change the length of the link to tune how your sway bar affects suspension movement. Upgrading to adjustable links improves handling precision, lets you customize your ride feel, and increases durability on rough terrain.
What Adjustable Sway Bar Links Do
Sway bars reduce body roll by linking the left and right suspension together, keeping your Can-Am Maverick X3 stable during turns. The sway bar links are the connectors transferring forces between the sway bar and suspension arms. Adjustable sway bar links let you lengthen or shorten these rods to change how much the sway bar resists suspension movement side to side. By fine-tuning link length, you control the balance between tight handling and smooth suspension travel that suits your riding style.
For example, shorter adjustable links preload the sway bar, creating a stiffer setup that improves cornering response but can harshen the ride. Longer links reduce the sway bar’s effect, allowing better wheel articulation for rough trails and bigger bumps. This flexibility is critical in off-road conditions where terrain varies.
Why Upgrading Matters for the Can-Am Maverick X3
Stock sway bar links on the Can-Am Maverick X3 are fixed length and often not built to withstand off-road racing or aggressive trail riding. They can wear out prematurely or fail under high stress. Adjustable sway bar links from brands like Shock Therapy offer unmatched durability with the longest lasting rod ends and heavy-duty materials that resist bending or breaking.
This durability ensures your suspension settings stay consistent even after intense desert runs or rock crawling. The adjustability means you aren’t stuck with one sway bar setup. You can change it for smoother rides during trail rides or tighter handling during competitive racing without replacing parts.
How to Adjust Your Sway Bar Links
Adjusting sway bar links involves measuring the current length, then turning the threaded rod ends to increase or decrease length. For best results, use a tape measure or caliper and adjust both left and right links evenly to keep the sway bar centered. A common approach is to start with the stock length and make small increments of 1/8 to 1/4 inch until you reach the preferred handling.
Tools required include an adjustable wrench or hex keys compatible with the rod ends. Make sure you lock the jam nuts after adjustment to prevent the links from loosening during rides. Check for equal bolt torque on both ends and visually confirm the links are straight without binding.
Adjustments should be tested by driving the vehicle slowly, noting cornering behavior, body roll, and suspension compliance. Fine-tune until you achieve the balance you want between stability and comfort. Typical adjustment ranges run from about 8 to 12 inches depending on the specific suspension arm length and sway bar design of the Maverick X3.
Benefits You Can Expect
Upgrading to adjustable sway bar links improves cornering control and reduces unpredictable suspension behavior in rough terrain. Tuning link length controls roll stiffness to match your weight, tire choice, and terrain conditions. This means you can dial out excessive body lean while maintaining enough wheel travel for rocks and dips.
Durability is a major benefit as well. High-quality adjustable links resist bending and wear better than stock parts, which extends service intervals and prevents failures that could strand you off-road. CO2 laser-engraved logos on premium links also add a stylish touch that signals a serious upgrade.
Things to Watch Out For
Uneven adjustment of the left and right sway bar links can cause handling imbalances, including pulling to one side. Overly stiff sway bars from very short links may lead to bottoming out or harsh rides on uneven ground, which can increase driver fatigue or damage suspension components. Make adjustments gradually and test thoroughly.
Installation demands proper tools and knowledge of your Maverick X3’s suspension geometry. Incorrectly installed or poorly adjusted links can accelerate wear on rod ends and suspension arms. For riders unfamiliar with suspension tuning, professional installation or guidance is recommended.
How Limit Strap Kits improve Can-Am Maverick X3 Shock Performance
Limit strap kits act as safety devices that control the maximum extension of the Can-Am Maverick X3’s shocks. These straps prevent the suspension from stretching beyond its designed limits during aggressive off-road riding or big jumps. Without limit straps, shocks can overextend, which risks damage to the shock body, shafts, and mounting bolts. The straps effectively take the place of the standard bump stops in controlling suspension travel but with more reliable and consistent prevention of overextension.
Most limit strap kits designed for the Can-Am Maverick X3 are compatible with popular shock brands like Fox and Showa. These kits typically include a strong, reinforced polyurethane or nylon strap and mounting hardware engineered to fit the factory shock mounts or aftermarket setups. Fox and Showa shocks on the Maverick X3 models from 2017 through 2021 often have dedicated slots or mounting points where these limit straps can be securely bolted in place. Compatibility depends on the exact shock model and lift height, so matching the kit to your shock type and suspension geometry is essential to ensure proper function.
Installing a limit strap kit involves loosening the suspension forks to attach the strap securely between the shock eyelets or the shock body and the frame. You need to measure the fully extended length of the shocks and set the strap length so it stops the suspension within half an inch to one inch of full extension. This avoids harsh bottoming out while giving maximum travel. Most kits include adjustable straps or multiple mounting holes to fine-tune this setup for different ride preferences or terrain types. Proper tightening of all bolts to the manufacturer’s torque specs, usually around 10 to 15 ft-lbs, ensures the kit stays secure under extreme forces.
Cost for quality Can-Am Maverick X3 limit strap kits ranges from $40 to $90 depending on brand and materials, making it a relatively affordable upgrade. Installing the straps takes about 30 minutes to an hour if you have basic hand tools. The most noticeable ride improvement is safer shock function during high-speed landings, steep drops, and rough terrain. You reduce risk of bent shock shafts, oil leaks, and torn seals, extending the lifespan of your suspension components. Another benefit is improve confidence in technical terrain knowing your suspension won’t overextend and cause unpredictable handling.
Check your limit strap length before each ride and replace straps showing cracks or fraying to avoid sudden failure at full suspension extension.
Not using limit straps or installing them incorrectly can result in premature shock failure or damage to suspension mounts. Overly short straps that stop travel too soon can make the ride harsh and reduce suspension performance. Conversely, straps too long won’t prevent overextension, defeating their purpose. Adjusting them for your exact Can-Am Maverick X3 model and ride style is critical for peak performance and safety on the trail.
Dual Rate Spring Kits: What They Are and When to Upgrade
Dual rate spring kits use two different spring rates combined in a single coil spring setup. This design means the initial part of the spring compresses more easily to absorb small bumps, while the second, stiffer section engages as the suspension travels further. For your Can-Am Maverick X3, this translates to a ride that feels softer over minor roughness but firm and controlled during bigger hits or jumps.
This layered spring behavior improves both ride quality and handling. You get better wheel contact with the ground and reduced harshness that usually comes from a single-rate spring tuned either for soft or hard impacts. The softer initial rate cushions regular trail terrain without sacrificing the ability to handle aggressive off-road use where strong shock resistance is necessary.
Installing dual rate spring kits requires swapping out your Maverick X3’s existing coil springs. It’s important to pick springs matched to your vehicle’s weight, ride height preferences, and typical terrain. Many aftermarket manufacturers provide spring kits with recommended setups based on these factors. Expect to pay between $200 and $400 for a quality dual rate spring kit, though prices depend on brand and materials.
Installation involves removing the wheels and shocks, then decompressing the current springs using a spring compressor tool to safely extract them. After the dual rate springs are seated onto the shock assembly, the shocks are reinstalled and the suspension is tested for proper travel and clearance. This process usually takes one to two hours for someone experienced with suspension work, or longer at a shop with a labor charge around $80 to $120 per hour.
People who use their Can-Am Maverick X3 mostly on varying trail conditions, with both smooth stretches and rough, technical sections, benefit the most from dual rate springs. They especially improve performance for riders who jump or tackle big obstacles regularly but want to keep comfort on less aggressive terrain. Also, if you add heavier accessories or bump up tire size, dual rate springs help maintain better suspension balance.
Be cautious if your off-road riding focuses mostly on extreme racing or consistently harsh terrain. In that case, a single-rate spring designed specifically for high loads might be more predictable under all conditions. Also, improper matching of spring rates to your vehicle or off-road style can cause poor ride quality or premature wear on shocks and suspension components.
After installation, a good result includes smoother absorption of small bumps, reduced shock bottoming during big impacts, and a stable ride without excessive body roll. Regularly inspect springs for sagging or damage, and recheck suspension alignment as dual rate springs slightly shift preload settings. Adjusting your Can-Am X3’s shock damping once these springs are on helps optimize the overall feel tailored to your riding style.
Step-by-Step Installation Checklist for Can-Am X3 Shock Upgrades
Installing Can-Am X3 shocks is moderately challenging but manageable with basic mechanical skills and the right tools. You’ll need common hand tools, a jack or lift to support the vehicle, and safety equipment. Proper preparation and careful steps ensure your new shocks work as intended and last longer. Gather the following tools before starting:
- Socket wrench set (commonly 13mm, 15mm, and 18mm sockets)
- Torque wrench to tighten bolts to manufacturer specs
- Floor jack or ATV lift to raise and support your Can-Am Maverick X3 safely
- Penetrating lubricant for loosening stuck bolts
- Work gloves and eye protection
- Rubber mallet or soft hammer for gentle shock removal if needed
Begin by positioning your Maverick X3 on level ground and engaging the parking brake. Use the floor jack or lift to raise the vehicle so the wheels are off the ground, then place jack stands under the frame for safety. This relieves pressure on the shocks and suspension components.
Spray penetrating lubricant on all shock mounting bolts to ease their removal. Start with either the front or rear shocks depending on your working space. Remove the lower and upper shock bolts with the appropriate sockets. You may need to carefully pry or tap the shock to free it from the mounts. Keep track of any spacers or washers as they must go back in the same order.
Position the new shocks in place. Insert the upper mounting bolt first, then attach the lower bolt. Tighten each bolt by hand initially to ensure proper alignment, then use the torque wrench to tighten according to Can-Am specifications, typically around 33 to 40 ft-lbs. Avoid overtightening, which can damage bushings.
Test each installed shock by compressing the suspension a few times with the Maverick’s wheels on the ground. Look for smooth motion without binding, unusual noises, or leaks around the shock body. Take a short low-speed test drive on a flat surface to confirm improved ride quality and handling. Check bolts again after the test drive for security.
Some users upgrade front and rear shocks at different times. Only one end can be done using the same procedure, but keep in mind the handling might feel unbalanced until all shocks are matched. A shock with a reservoir or adjustable features should have those settings adjusted after installation according to the kit instructions.
Common Mistakes in Can-Am X3 Shock Upgrades and How to Avoid Them
Upgrading the shocks on your Can-Am Maverick X3 can improve ride quality and handling, but several errors often lead to disappointing results or damage. Using the wrong shock length or spring rate is a frequent mistake. Mismatched components cause poor suspension travel or handling issues, sometimes even damaging mounting points. Check your model’s specifications carefully and match shock dimensions EXACTLY to your Maverick X3’s setup before ordering aftermarket shocks.
Failing to properly torque mounting bolts or skipping new hardware can also cause problems. Bolts that aren’t tightened to factory specs may loosen under off-road stress, while reusing old or worn bushings and spacers often leads to premature noise and wear. Use a torque wrench and follow Can-Am specifications, typically 15-25 ft-lbs for shock mounts, and replace hardware when installing new shocks.
Another common error is neglecting shock break-in or improper adjustment during installation. Most aftermarket Can-Am X3 shocks require a break-in period, usually 100 miles of moderate riding, to settle internal oil and seals. Riders who skip this step may feel harsh or inconsistent damping right away. After break-in, adjust the shocks incrementally: start at factory baseline settings, then tweak rebound and compression dampers in small steps until the ride feels balanced for your terrain and style.
- Always verify shock length and spring rate match your specific Maverick X3 model and lift height
- Use a calibrated torque wrench to tighten mounting hardware to factory specs
- Replace old bushings and mounting hardware with shock kit components
- Follow recommended break-in mileage before making performance adjustments
- Adjust rebound and compression damping gradually after break-in
- Keep suspension clean and inspect shocks regularly for leaks or damage
Improper torque or failing to replace worn bushings can cause early failure or dangerous detachment during rides.
Overshooting spring rates is another pitfall. Choosing shocks that are too stiff can reduce traction and increase rider fatigue because the tires don’t stay in contact with uneven terrain. Conversely, too soft a setup causes bottoming out and poor control in high-speed bumps. Evaluate your driving style and intended terrain carefully when selecting shock rates, aggressive racers need firmer springs while trail riders may prefer moderate rates for comfort.
Finally, ignoring shock maintenance after upgrade limits their lifespan and performance. Clean shocks regularly, check seals for leaks, and top off or replace oil per manufacturer guidance. High temperatures in desert riding or mud exposure in wet conditions both accelerate wear; more frequent inspections are needed then. Proper care ensures your upgraded shocks maintain peak performance longer.
How to Choose the Best Shock Upgrade for Your Can-Am X3 Model
Choosing the right shock upgrade for your Can-Am Maverick X3 depends on your specific model, terrain preferences, ride style, budget, and compatibility. Start by identifying the exact Can-Am X3 variant you own, such as the Turbo RR, Turbo R or X RC, as shock designs and mounting points vary across these models. Selecting shocks designed explicitly for your model ensures proper fit and maximizes performance without additional modifications.
Next, consider the primary terrain you ride on. For trail riding, shocks with a focus on comfort and controlled rebound at moderate speeds work best. These shocks typically feature softer springs and tuned damping to absorb bumps without harsh feedback, improving ride quality over rocks, roots, and uneven trails. In contrast, racing or high-speed desert running requires shocks built for high-speed compression and rebound control. High-performance shocks with advanced valving systems and stiffer springs provide better stability and reduce bottoming out on jumps or hard landings.
Your riding style further influences shock choice. Aggressive riders pushing their Can-Am X3 to its limits benefit from adjustable shocks that allow fine-tuning of compression and rebound settings. This customization adapts the suspension to track conditions and personal preferences, improving handling and lap times. Casual riders who prioritize durability and low maintenance may prefer simpler, non-adjustable shocks with reliable factory tuning.
Budget plays a considerable role in narrowing options. Entry-level shocks suitable for light trail use can start around $300 per shock, while high-end racing shocks with multiple adjustment points and reservoirs may exceed $1,000 each. Align your budget with your intended use; overspending on race-level shocks makes little sense for casual trail riding, while investing in entry-level shocks for racing may compromise performance and safety.
Compatibility ensures your chosen shocks install without modifications. Many aftermarket shock manufacturers produce versions tailored to different Can-Am X3 models and configurations, enabling smooth upgrades without custom brackets or fabrication. Confirm the shock’s exact fitment by matching part numbers or consulting with suppliers who specify dedicated fits for models like the Turbo R or X MR.
Here is a practical decision rule to apply: first, verify your Can-Am X3 variant to find shocks compatible by fitment. Then match your typical terrain and riding style with shock features, comfort-oriented softer springs and moderate damping for trail riders, stiffer springs and advanced valving for racers. Factor in your budget to choose the best balance between performance and cost. Finally, ensure shocks come from reputable manufacturers offering model-specific kits to avoid fitment issues.
Properly chosen shocks improve handling, ride comfort, and safety. Common problems arise when shocks are mismatched, using race shocks off-road can lead to a harsh ride, while soft trail shocks on a race track cause instability and premature wear. Taking the time to follow this decision rule minimizes returns and improve your Can-Am X3 experience.
Maintenance and Longevity Tips for Can-Am Maverick X3 Shocks
Can-Am Maverick X3 shocks typically last between 30,000 and 50,000 miles, depending on terrain, riding style, and maintenance. Harsh off-road conditions like rocks, mud, and frequent jumps shorten their lifespan. Regular care extends shock life and keeps your ride smooth and controlled.
Maintenance starts with routine cleaning after each ride to remove dirt, mud, and debris from the shock body and shaft. Use low-pressure water and a soft brush to avoid damaging seals. Check for oil leaks around the shock ends; leaking oil means the seals may be worn and need service or replacement. Inspect shock mounting bolts for tightness to prevent extra wear and noise. Applying silicone spray to the shock shaft can help prevent corrosion and keep the seal lubricated, but avoid petroleum-based lubricants that damage seals.
- Clean shocks and shafts gently after every off-road ride
- Check for oil leaks and unusual noises monthly
- Tighten mounting bolts to Can-Am’s torque specs (usually 22, 30 ft-lbs)
- Inspect for worn bushings or bent components during servicing
- Replace seals or rebuild shocks every 20,000, 30,000 miles if used in heavy-duty off-roading
- Store the vehicle in a dry place to prevent rust on shock components
- Schedule professional shock rebuild or replacement if you notice reduced damping or handling issues
Signs that Can-Am X3 shocks need replacement include excessive bouncing, poor handling on rough trails, unusual noises like clunks or hissing, visible damage such as dents or bent shafts, and oil leaks. Vehicle sagging or bottoming out during rides can also signal worn shocks. When these issues arise, a professional inspection is recommended. A shock rebuild or replacement can cost $300 to $700 per shock, depending on service complexity and parts used.
Can-Am typically covers shocks under their factory warranty for one year from the date of purchase against defects in materials and workmanship. This warranty doesn’t cover wear from off-road use, damage from impacts, or improper installation. Retain your purchase receipts and maintain regular service records to support warranty claims. Always follow Can-Am’s instructions and safety guidelines when maintaining or replacing shocks, and consider a licensed mechanic for advanced repairs to ensure longevity and performance.
Step-by-Step Action Plan for Upgrading and Maintaining Your Can-Am X3 Shocks
Follow these steps to improve your Can-Am Maverick X3’s suspension performance, while ensuring reliability and safety.
- Before You Start: Identify your riding style and terrain to select the most suitable shock type and suspension components.
- Day 1: Compare OEM and aftermarket options, focusing on adjustability and durability, then order your chosen shock upgrade kit.
- Day 3: Inspect your current suspension for wear and damage before installation to prevent issues during upgrade.
- Day 4-5: Install shocks following the checklist; verify correct mounting and hardware torque to confirm proper fitment.
- Week 2: Adjust sway bar links and limit straps incrementally while testing ride quality; feel for reduced body roll and controlled wheel travel.
- Week 4: Fine-tune dual rate springs, if applicable, based on your comfort and handling; confirm no harsh bottom-outs or excessive softness.
- Month 2 and Beyond: Perform regular inspection and maintenance, such as cleaning and checking for leaks, to extend shock life and performance.
Frequently Asked Questions
What Makes Can-Am X3 Shocks Different from Other UTV Shocks?
Can-Am X3 shocks are specifically designed for the Maverick X3’s suspension setup, offering tailored damping and spring rates. This precision improves handling and durability in extreme off-road conditions unique to the X3’s high-performance design.
Are Can-Am X3 Shocks Compatible with Other Maverick Models?
No, Can-Am X3 shocks are engineered specifically for the Maverick X3’s geometry and suspension travel. Using them on other models may cause fitment issues and improper suspension performance.
Can I Use Stock Can-Am X3 Shocks for Desert Racing?
Stock shocks aren’t ideal for high-speed desert racing; they lack the damping and travel needed. Upgrading to aftermarket shocks like Fox or Showa with dual rate springs improves control and prevents bottoming out.
Do Can-Am X3 Shocks Require Special Maintenance?
Yes, maintaining seals and checking for leaks extends their lifespan. Regular cleaning and occasional rebuilds keep performance consistent, especially after heavy off-road use or water crossings.
How Do Can-Am X3 Shocks Affect Ride Comfort?
Properly tuned Can-Am X3 shocks balance stiffness and compliance to reduce harshness. Upgraded shocks often offer adjustability, letting you customize ride comfort based on terrain and personal preference.
What Is the Average Lifespan of Can-Am X3 Shocks Under Normal Use?
Under normal trail riding, Can-Am X3 shocks last several years but heavy desert or racing use shortens lifespan. Regular inspections help catch wear early and avoid sudden failures.
The Bottom Line
Your Can-Am Maverick X3 shocks are key to a smoother, more controlled ride. Taking the time to select the right upgrades and maintain them improves safety and enjoyment on every trail. Start by assessing your current setup today and plan your first upgrade step based on your typical ride needs.